An optional HUD is sold separately from Beadrez and bundled with the "LinkSync Add-on".
Previous owners of LinkSync can get the HUD by rezzing the update cube from the add-on.
Using the HUD - Try these steps to get started and to learn about some things to check for in case of problems.
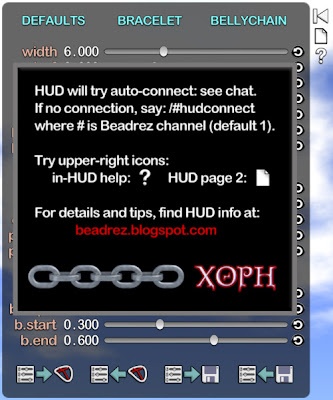
1. Wear the HUD while near Beadrez. Three sizes are included. Pick size according to your monitor or window size. Check position: the HUD should attach at the top-left corner with one page visible, as pictured below. It is designed to work best on the left, but may work at the top too.

Above: Newly-rezzed HUD. Click instruction box to hide it.
2. Check that the HUD connected to Beadrez: if so, there should be a local chat message "Connected on channel 1 to: Xoph Beadrez v6" (channel number and object name will differ if you changed them). This message is the only way to be sure it's properly connected. If you don't see the chat message, follow the instructions seen in the HUD, or check Troubleshooting below.
3. Click on the HUD's black info box (splash screen) to dismiss it.
4. Sync the settings: click one of the bottom left icons on the first HUD page. The leftmost icon sends current HUD settings to Beadrez, and the next one transfers Beadrez settings to the HUD (click only one of them, depending on which way you want to sync). Beadrez and the HUD might become desynched if you use certain commands from the old Beadrez menu (especially the ones with + or - in buttons) or if you work with multiple copies of the HUD or of Beadrez.
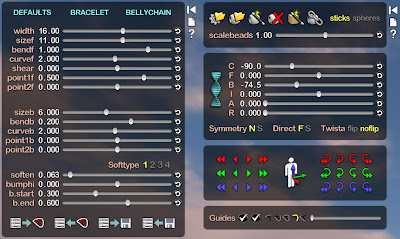
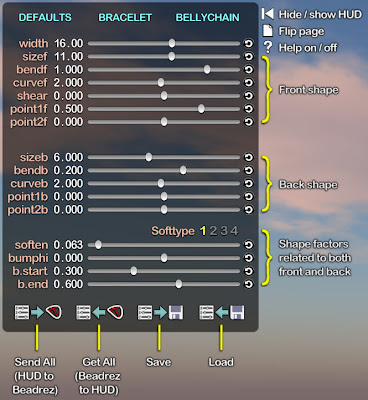
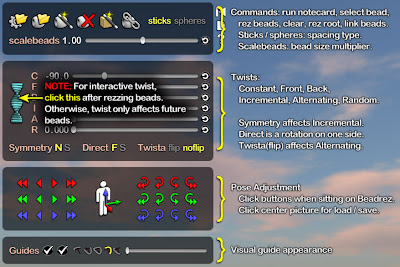
5. Try out the three icons at the top right of the HUD. These are hide/show, page flip, and help icons. The page flip will reveal a second HUD page, and the help will add in-HUD help labels, as seen in the pictures below. If there is any lag, some of the help text can be delayed. If you encounter any alpha glitches (some things on HUD looking too dark or in wrong front-to-back order), see Troubleshooting below.

Above: Two HUD pages. Normally, only one page is visible at a time. There is a page-flip icon at the top right.

Above: First page of HUD with help labels.

Above: Second page of HUD with help labels.
6. Sit on Beadrez and try out the HUD's pose buttons (on the second HUD page). Click the picture at the center of the pose buttons to get more options in a menu.
7. On the first HUD page, experiment with the sliders to change shape. To the right of each slider, there is a small icon that resets the slider to a stored position. There is a way to edit this stored position, described later. On this HUD page, you can also select from the defaults (top of HUD) or load/save shapes (bottom of HUD).
TIP: If you save important settings to the HUD or edit it, make a backup by copying it in inventory.
8. Rez beads: on the second HUD page, click the bead selection icon (second-to-left at the top; a bead with a folder). This triggers the bead selection menu, and then switches to the rezzing menu once you select a bead. Click "fill" in the rezzing menu for a quick fill. This is also a good time to try the clear icon (red X) and the rezmenu button (magic wand by bead).
9. Adjust twisting. To begin, you must click the twisty thing to the left of the twist sliders. You must click this any time you rez more beads, if you want them to twist interactively. Otherwise, twist adjustments apply only to future-rezzed beads. Check for a chat message that says "Initializing twist module". Then, experiment with the twist sliders.
10. Rez a root prim: click the icon in the top row that shows a magic wand by a box. If you want to use your own root prim, see the FAQ for how to replace the root box inside Beadrez.
11. Link the necklace: click the icon directly to the right of the rootbox icon (showing links by a bead). A popup will ask you for linking permissions. After you grant linking permissions, the necklace should auto-link. It can take a few minutes, depending on prim count. In case of linking problems, see the FAQ.
12. You can take the necklace and wear it now.
13. There are some other buttons to try out, like the sizing guide controls at the bottom of page 2, or the other icons at the top. Read the in-HUD help labels and explore. Read the rest of the blog for all the details.
Notes about connecting to Beadrez: If a new HUD is rezzed near a new Beadrez on script-enabled land, they will connect automatically. Check for the chat message about connection (step 2).
You will have to connect manually when: you changed Beadrez channel, rezzed Beadrez after the HUD, weren't near a Beadrez when wearing the HUD, or want to connect to a different unit.
To connect manually, use Beadrez's hudconnect command. For example, if Beadrez is on channel 1, type "/1hudconnect". The HUD will chat if a connection is made.
Troubleshooting:
If Beadrez does not respond to all HUD commands:
1) Make sure you are on script-enabled land.
2) Reconnect the HUD and Beadrez as above. It's possible that Beadrez responds to some, but not all, commands if not connected correctly.
3) If only the twist sliders have this problem, carefully read step 9 above.
4) If Beadrez responds but beads themselves don't (example: can't clear), then you probably did not put the LinkEnhancer script in the beads. See "Teachpad: Adding Your Own Beads".
Alpha glitches (a visual problem)
If
some sliders look darker than others or the help text cannot be read
in the twist slider area, there are alpha glitches. The HUD was designed
to avoid these (in theory), but viewers are unreliable. To handle
these:1) Re-attach the HUD or wear a fresh copy. This always works for me, but different viewers may be different.
2) If glitches only occur when help is turned on, or only for text in the twist area, you can look at the pictures above as an alternative to using in-HUD help.
3) To fix glitches permanently: edit the background prims (5 dark panels of the HUD) to have the "blank" texture and 0 transparency (done using "Edit Linked Parts" checkbox and Texture tab of SL's Edit tool).
4) Note glitches are only an appearance problem: HUD functions will still work.
Note about running a notecard while HUD is up
The rez (add) commands that are in notecards may be ignored if
you touch the HUD while a notecard is running. Let the notecard finish running first. Limitations and Commands not in the HUD
Not every Beadrez command is available from the HUD, and settings from those commands can't be saved into HUD memory. The following features cannot be accessed from the HUD:
resetfull - command for full script reset.
regclear - region-wide version of clear
remscripts - remove scripts (not needed if linking)
maxbeads - set maximum number of beads rezzable
info, listh, listb - chat information about settings, commands, beads
rezblock - stop (pause) rezzing at a certain path point
rep - for repeating commands or sequences
space - override spacing value stored in bead
scalebeads2 - relative (cumulative) version of scalebeads
accelon, acceloff - affect rezzing speed and precision
The HUD and Beadrez may become de-synched in certain cases. See step 4 in the earlier steps ("Using the HUD").
Advanced: HUD customization
Some aspects of the HUD can be customized by editing its prim names or descriptions.
MAKE A BACKUP and read carefully if you try this, because errors can break the HUD.
Each of these edits involves changing a name or description in a child prim. You will need to use "Edit linked parts" in SL's editor to select the correct prim and then change its name or description in the editor's "General" tab.
Slider default value:
Prims to the right of sliders have names like "setslider1,16". Change the second number to the desired default value. Make sure that the value is within the actual slider range, and do not change any other text (leave the comma and everything before it alone). For example, "setslider1,14.3" (without quotes) will change the width slider default to 14.3.
Slider range:
Slider range can be changed to give finer control or a wider range of values.
Most slider prims have names like "slider1" (width slider), but some have more codes like "sliderL18,#M" (C twist slider).
Before editing anything, check if the name has an L in it. The L will be right before the number, as in "sliderL18,#M".
If the slider name DOES have an L in it: Change this slider's range by changing two numbers in the prim's description. Example: the original C twist description is "twistc;-180.0;180.0;144". The first two numbers give slider range, here -180 to 180. Change these two numbers to change range, but do NOT change the third number (and leave the semicolons between items). For example, "twistc;0;90;144" changes the C twist slider range to 0 to 90. You will have to touch the slider to see that its new range is active.
If the slider name does NOT have an L in it, there are more rules:
1) No L and you only want positive numbers on the slider: change the same way as above.
2) No L and you want to include negative numbers: it is best for the range to center on zero. In other words, the smallest number (left value) should be the negative of the largest number (right value). This is not a strict requirement, because you might get OK behavior with other values, but it might also give weird slider response.
You can add or delete the L to switch between two modes, so you may wonder what the L does. It stands for "linear" and selects the way values are placed along the slider. For a linear (L) slider, a certain amount of slider motion always causes the same amount of change in the value. Otherwise (nonlinear, no L), the change is spaced out unevenly. For example, the width values change much faster near the right side of the slider than near the left side. This is a way to provide precision at small values while having a large overall range.
Help text position and size:
For the regular-sized HUD (not the smaller or larger one), you can store a new position for help text (for example, if you don't want text to block any other HUD prims): When the help is active, select one of the help text prims, move it and/or resize it, and change the prim description to "save" (but no quotes, and all lower case). After this, it should remember its new position and size. If it vanishes forever, you didn't type the right description. If it can no longer be turned off, you edited name instead of description.
For the smaller or larger HUD size, first change the help position and size in the regular-sized HUD. Then, switch its help off and on and make sure everything moves back correctly. Finally, copy the descriptions of the help text prims from the regular-sized HUD to the other HUD version.
